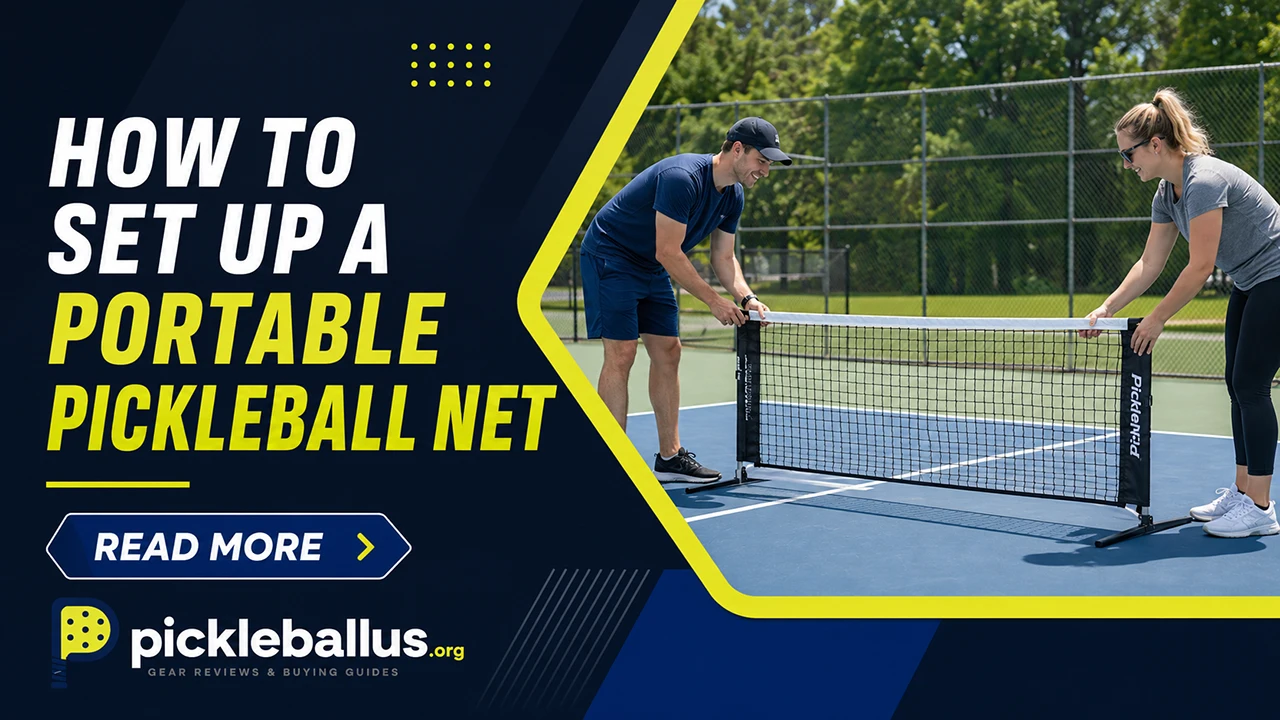
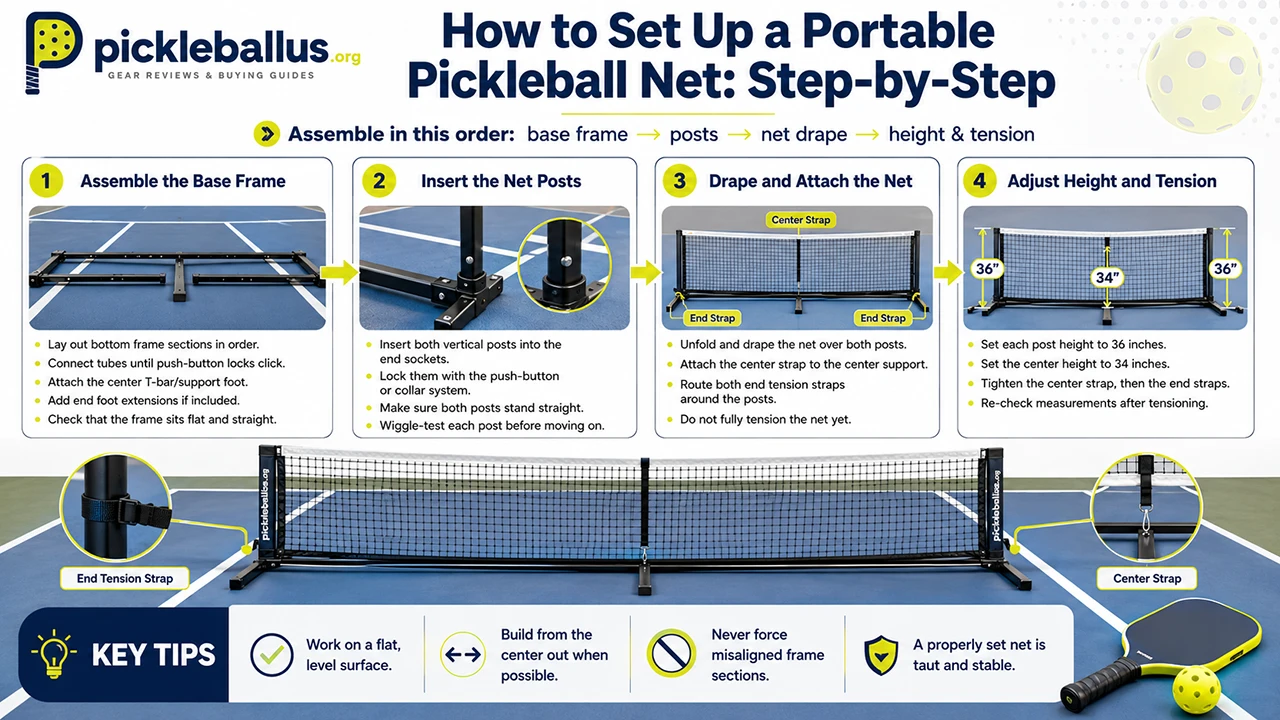
Setting up a portable pickleball net correctly takes five minutes or less once you know the sequence. The process breaks down into four core steps: assembling the base frame, inserting the net posts, draping and securing the net, and adjusting height to regulation specs — 36 inches at the posts, 34 inches at the center. Whether you are playing on a driveway, tennis court, gym floor, or backyard patio, the same fundamentals apply to every portable net system on the market.
Getting the setup wrong is more common than most players realize. A net that sags in the middle, posts that wobble after the first volley, or height that is off by a few inches all affect gameplay and fairness. Before you even think about warming up, the net needs to be stable, properly tensioned, and correctly measured.
Most players also overlook the pre-setup checklist — a quick scan of all components before assembly catches bent poles or a frayed center strap that would otherwise cause a mid-game collapse. A two-minute check saves you from rebuilding the whole thing from scratch.
This guide walks through every step of the setup process, the official net dimensions you need to match, the most common problems and how to fix them, and what to do with your net when the game is over. If you are still deciding which net to buy before setting one up, the guide on how to choose a pickleball net covers materials, frame stability, and portability in detail.
What Do You Need to Set Up a Pickleball Net?
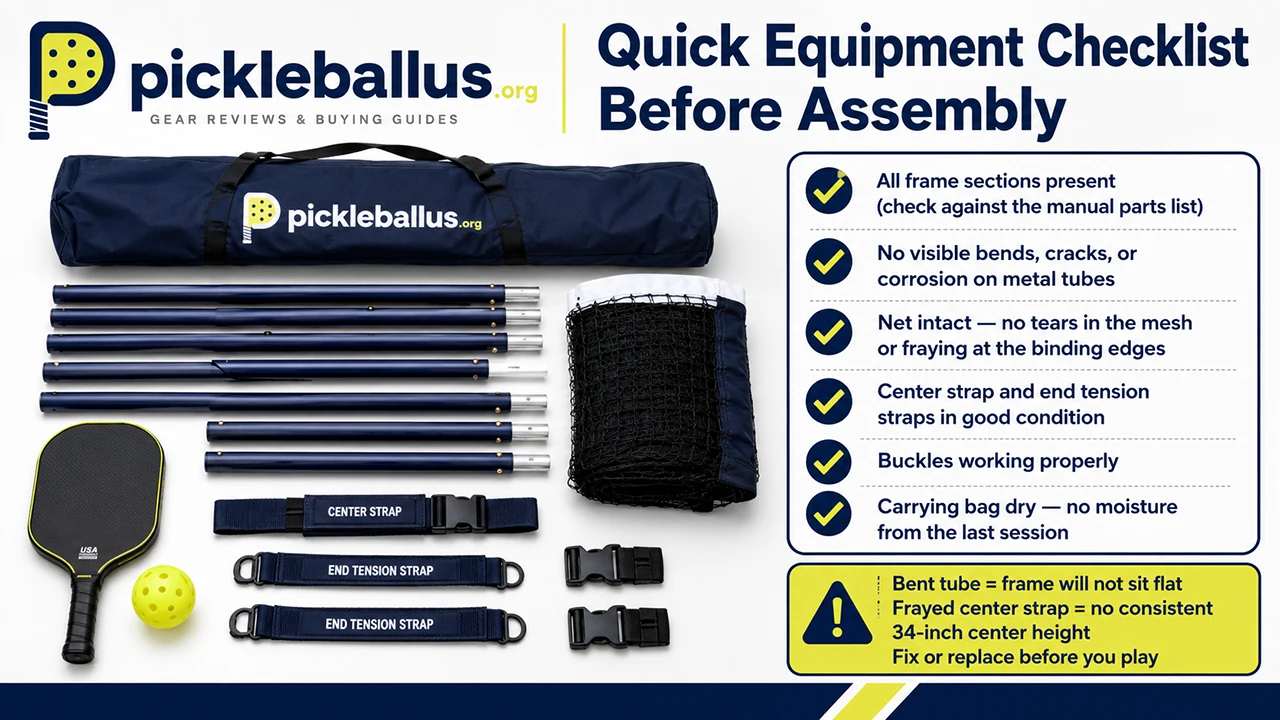
A standard portable pickleball net system includes a base frame, two vertical net posts, the net itself, tension straps, a center support strap, and a carrying bag. Most quality systems also come with numbered or labeled parts to make assembly faster — especially for first-timers who have not read the manual yet.
Here is what you will typically find inside the carrying bag when you unpack a new portable net:
- Base frame pieces — horizontal tubes that connect to form the bottom skeleton of the net. Usually 4–6 sections depending on the brand.
- Vertical net posts (2) — the tall poles that hold the top of the net at regulation height on each side.
- Center support bar or T-bar (1) — the middle upright that keeps the net from drooping at the center.
- Center height strap — a Velcro or buckle strap that sets the net to exactly 34 inches at the midpoint.
- Net tension end straps (2) — the straps at each post that pull the net taut from sideline to sideline.
- The net itself — usually black mesh with white vinyl binding along the top edge and down the center.
- Carrying bag with handles — zipped bag for transport and storage.
- Ground stakes (some models) — four metal pegs for soft outdoor surfaces like grass.
Before you start assembling, check every piece. Run your hands along the base frame tubes to feel for bends. Pull the net out and look for tears along the binding. Give the center strap a quick tug to make sure it has not frayed. This inspection adds about 90 seconds and is worth every one of them.
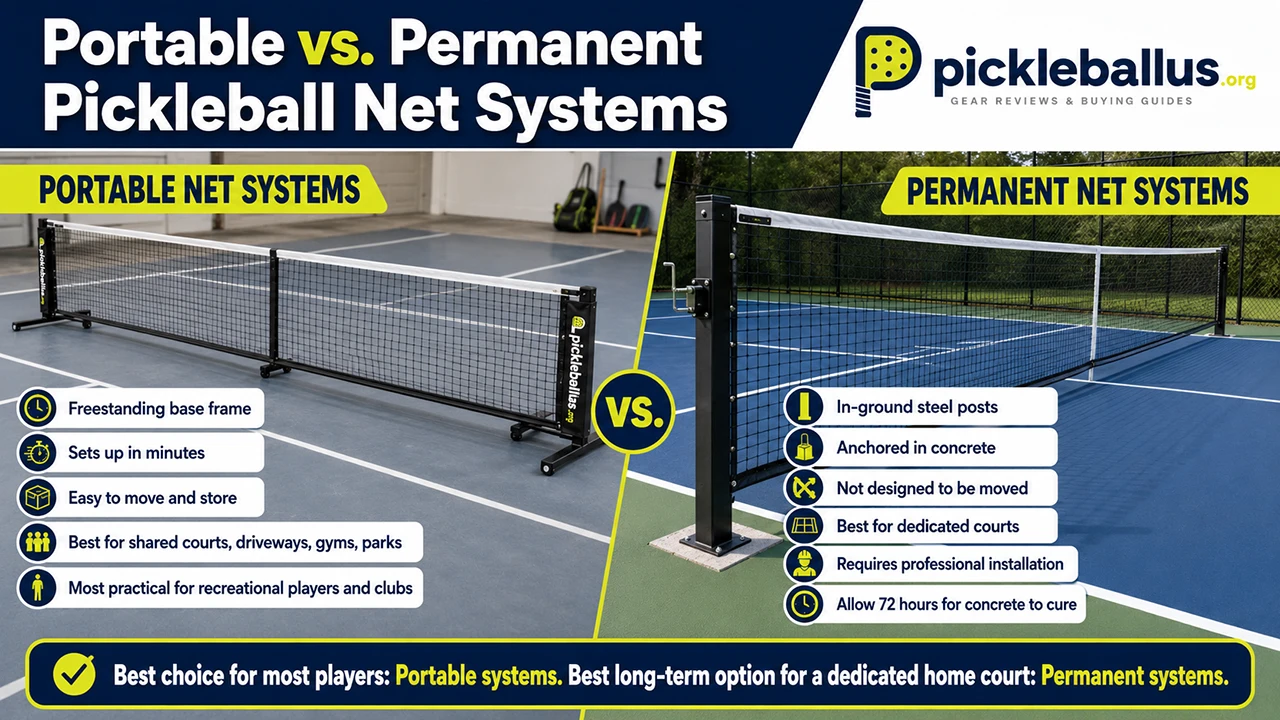
Portable vs. Permanent Pickleball Net Systems
Portable net systems sit in freestanding base frames and can be assembled and disassembled in minutes, while permanent nets are mounted to in-ground steel posts anchored in concrete. Portable nets are by far the more common choice for recreational players, club groups, and anyone who plays on shared courts or moves between locations.
Permanent nets are installed on dedicated courts and are not meant to be moved. They require professional post installation — digging holes, setting anchor sleeves in concrete, and waiting at least 72 hours for the concrete to cure before any net hardware is attached. If you are building a home court from scratch, a permanent system is worth considering long term. For everything else — tennis court conversions, driveways, gyms, parks — a portable system is the practical answer.
If you are shopping for a new portable setup, the best portable pickleball net roundup covers the top-rated systems across different price tiers and frame material types.
Quick Equipment Checklist Before Assembly
Before you lay out any parts, run through this check:
- All frame sections present and accounted for (compare against the parts list in the manual)
- No visible bends, cracks, or corrosion on any metal tubes
- Net is intact — no tears in the mesh, no fraying at the binding edges
- Center strap and end tension straps are in good condition, buckles working
- Carrying bag is not holding any moisture from the last session
If a tube is bent, the frame will not sit flat. If the center strap is frayed, you will not get a consistent 34-inch center height. Fix or replace before you play.
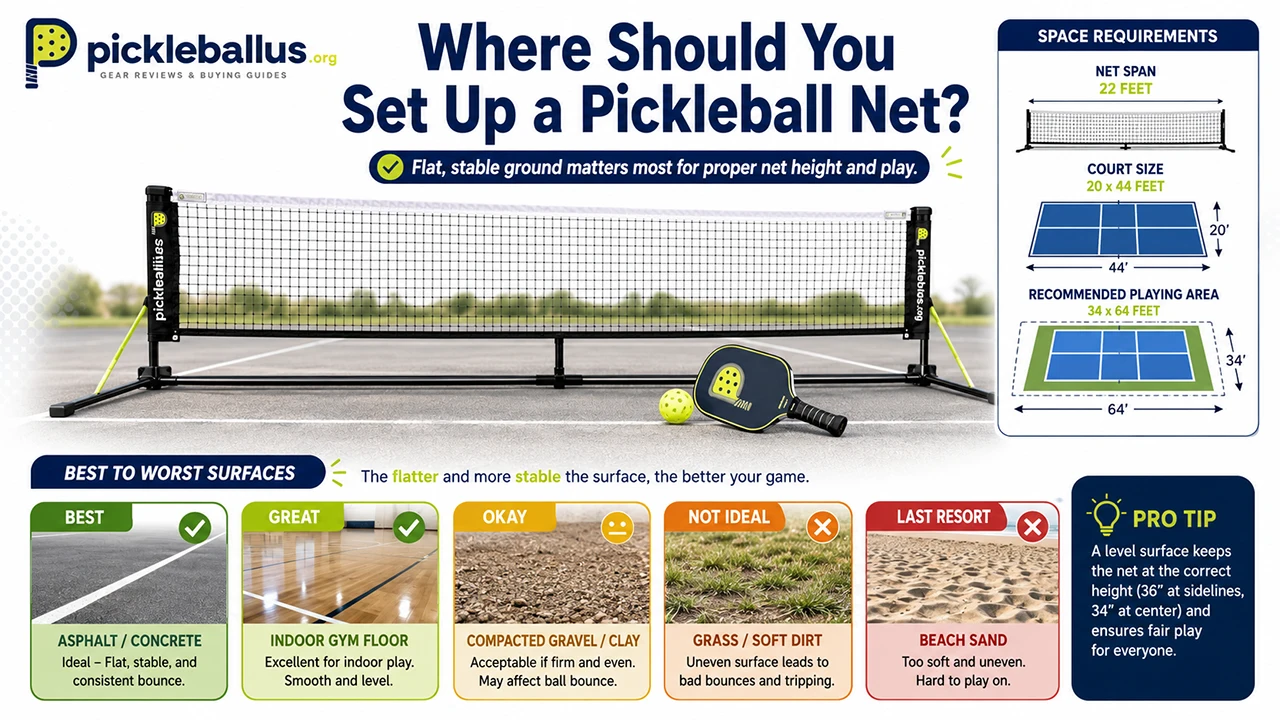
Where Should You Set Up a Pickleball Net?
A pickleball net can be set up on any flat, stable surface — asphalt, concrete, gym flooring, and hard-packed dirt all work well for portable systems. Grass and sand are technically usable but require ground stakes for stability, and uneven ground creates a leaning net that no amount of tension adjustment will fully fix.
The priority is a level surface. If the base frame is sitting on a surface that slopes even slightly, one post will sit higher than the other. That creates a net that is out of spec on one side, which affects where the ball crosses and how line calls are made.
Best Surfaces for Portable Net Setup
The most reliable surfaces from best to least ideal:
Asphalt and concrete are the top choices. The base frame sits flat, the feet grip well without stakes, and there is no risk of the system shifting during play. Most driveway and parking lot setups fall here.
Gym flooring (hardwood, rubberized sport tile) is ideal for indoor play. Clean, level, and typically marked with existing court lines. The frame feet will not scratch sealed hardwood if they have rubber foot caps — check your model before dragging it across the floor.
Packed gravel or clay courts work well if the surface is compacted. Loose gravel is unstable; avoid it.
Grass or soft dirt requires the four ground stakes that some portable systems include. Push the stakes through the base frame feet into the ground at each corner. The stakes prevent lateral sliding, but the setup is only as stable as the ground beneath it — water-logged or very soft soil is not suitable.
Beach sand is a last resort. Sand shifts, and even staked frames can tilt during active play. If you are playing casually on a beach, it is workable; just expect to re-level the net a few times per session.
How Much Space Do You Need?
An official pickleball court measures 20 feet wide by 44 feet long, with a recommended playing area of 34 feet wide by 64 feet long to give players enough room to move behind the baselines and along the sidelines without running into obstacles.
The net itself spans 22 feet — one foot wider than the court on each side — so you need at least 22 feet of clearance width just for the net. The full playing area needs more.
For driveway or backyard setups where you cannot fit a full 34 × 64-foot area, you can still play on a smaller footprint. The game is still functional at the minimum court dimensions (20 × 44 feet), especially for rallying and drilling. Just be aware that balls hit near the baseline will be out of bounds with very little buffer space behind you.
If you are sharing a tennis court, a single tennis court (78 × 36 feet) fits two pickleball courts side by side. The net position for each pickleball court is 22 feet from the end line.
How to Set Up a Portable Pickleball Net: Step-by-Step
A portable pickleball net assembles in four stages: base frame → posts → net drape → height and tension. Following this order matters — trying to tension the net before the center support is in place, for example, will result in incorrect height and a net that goes slack the moment you release the strap.
Work on a flat surface with enough room to lay out all parts before you start connecting anything. Most net systems set up fastest when you build from the center out rather than from one end to the other.
Step 1 — Lay Out and Assemble the Base Frame
The base frame is the horizontal foundation that runs the full 22-foot width of the net system. Start by identifying all the bottom frame sections. Most systems use color-coded or numbered pieces — if yours has labels, follow them exactly.
Lay the pieces out on the ground in the sequence they connect. Slide smaller-diameter sections into larger ones, pushing until you hear or feel a click from the push-button lock mechanism. Never force sections that do not click — misaligned buttons are the number one reason frames come apart mid-game.
Once the main base bar is assembled, attach the center T-bar or support foot at the midpoint. This is the piece that holds the bottom of the net at center court. On most systems, the T-bar slots into the center of the bottom crossbar and locks with a push button.
If your model includes bent-leg foot extensions on the end sections, snap those into the outermost slots now. These wide feet increase lateral stability, especially on outdoor surfaces.
When the frame is fully connected, stand back and eyeball it from one end. The frame should sit flat and straight with no sections angled upward or twisted. Give it a firm shake — if sections rattle loose, re-check the push-button locks before proceeding.
Step 2 — Insert and Lock the Net Posts
The two vertical net posts slot into the end sections of the base frame and lock in place with push-button mechanisms, threaded collars, or sleeve inserts depending on the model. Understanding your specific locking system before assembly prevents the most common mistake: inserting the posts before the frame is fully assembled and then having to partially dismantle everything to fix a misaligned section.
For more detail on post types, load capacities, and what separates a sturdy post from a flimsy one, the guide on pickleball net posts covers every post configuration currently used in portable and permanent systems.
Insert the vertical post into the end base socket with the post cap (end cap) facing upward. Push down until you hear the lock engage. Repeat on the other side. Both posts should stand straight — use your eye level to check vertical alignment. A post that tilts inward or outward usually means the base section beneath it is not fully connected.
Give each post a firm two-handed wiggle test. If the post moves at the base, check the lock button on the base frame section. If the post rocks at the insertion point, the socket itself may be partially blocked by debris or a manufacturing burr — clean it out and re-insert.
At this stage your frame should look like a wide, goalpost-shaped structure sitting flat on the ground — two vertical poles connected by a long horizontal bottom bar with a center support rising from the middle.
Step 3 — Drape and Attach the Net
Unfold the net and drape it over the two vertical posts so that the top binding runs across the top of both posts and the bottom edge hangs toward the ground. Most portable nets have a top sleeve or loop that slides over the post caps — feed the post through this sleeve before inserting the post into the base if your model uses this design.
Once the net is over both posts, locate the center strap. This is the short Velcro or buckle strap attached to the bottom of the net at the midpoint. Wrap it around the center support bar and close the Velcro. This is what will set the center height to 34 inches in the next step.
Now find the two tension end straps — one on each side of the net, at the outer edges. These straps wrap around the base of each vertical post and pull the net taut from sideline to sideline. Feed each strap through its tension clip: thread up through the bottom of the clip, around the post, and back out the front. Pull the free end of the strap to increase tension, and release to lock it in place.
The net should now be hanging across the full frame with the center strap attached and both end straps routed but not fully tensioned yet. Do not finalize tension until after you have set the height in step 4.
Step 4 — Adjust Net Height and Tension
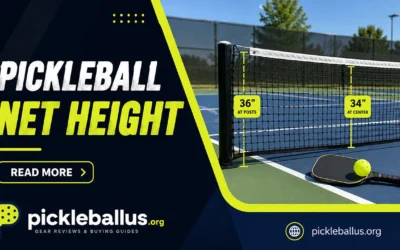
A regulation pickleball net stands at 36 inches at each post and 34 inches at the center. These are the official measurements per USA Pickleball and the International Federation of Pickleball, and they apply to all sanctioned play.
For a deep dive into the exact specifications, tolerances, and how net height affects shot selection, see the full breakdown on pickleball net height.
To set the height:
- Place your measuring tape at the ground directly under the top edge of the net at one post. Adjust the post height collar or slide the net sleeve up or down until the top of the net reads exactly 36 inches. Repeat on the other post.
- Move to the center and measure from the ground to the top edge of the net. Adjust the center strap (tighten to raise, loosen to lower) until the center reads exactly 34 inches.
- With height set on both posts and center, pull the end tension straps firmly. The net should be taut across its full width — no major sag between the sideline and center support.
Run the measuring tape one more time after tensioning. Tension sometimes shifts the height slightly. If the center has dropped from 34 inches, adjust the center strap. If a post side has changed, re-adjust that post’s collar.
A properly set net does not wobble when you push the top edge lightly, and a ball rolling along the ground should fit under the center of the net only with a firm push — not slide through freely and not get stuck either.
What Are the Official Pickleball Net Height Dimensions?
An official pickleball net is 22 feet wide, 36 inches tall at the two sideline posts, and 34 inches tall at the center. These dimensions are set by USA Pickleball and mirrored by the International Federation of Pickleball (IFP) for all regulated play worldwide.
The two-inch drop from post to center is intentional. It matches the original design inherited from badminton when pickleball’s founders lowered the net height in 1965. The slight sag at center creates a natural corridor for cross-court shots that is lower than the straight sideline height, rewarding players who can aim their dinks and drives accurately.
For the full technical breakdown — mesh size requirements, post diameter tolerances, binding specifications — the pickleball net official specifications page covers every parameter used in USA Pickleball-sanctioned tournaments.
How to Measure Net Height Correctly
Measure net height from the playing surface directly beneath the top of the net to the top edge of the net binding — not the tape, not the post, not the frame. The binding is the white vinyl strip sewn along the top edge of the net. That is the official measurement point.
Use a rigid measuring tape rather than a cloth tape — cloth tapes can droop and give a false reading. Hold the tape vertically from the ground upward to the underside of the top binding.
Measure in three spots:
- At the left post (should read 36 inches)
- At the right post (should read 36 inches)
- At the exact center of the net (should read 34 inches)
If your measurements are off by half an inch or more, adjust before you start playing. Close calls at the net during a match often come down to whether the net is correctly set — a net that is two inches too high changes the game noticeably.
Does Your Net Have to Be Regulation Size?
For casual recreational play, league nights, and practice, a net that is close to regulation — 36″/34″ height and at least 20 feet wide — is perfectly fine. You do not need a USA Pickleball-approved net to enjoy the game.
For sanctioned tournament play, you do. Tournament venues use nets that meet the full 22-foot width and exact height specifications. If you are entering a rated tournament, check the event rules — some allow players to bring their own nets, others provide court equipment on-site.
For drills, backyard games, and club sessions, the most important thing is consistency: pick a height, set it accurately, and keep it the same every time you play. Muscle memory for net clearance and dinking depth depends on a consistent reference point.
How to Fix Common Pickleball Net Setup Problems
Most pickleball net setup problems fall into three categories: a sagging center, unstable posts, and uneven height between the two sides. All three are fixable in under two minutes once you know what is causing them.
The good news is that these issues almost always trace back to one missed step in the assembly sequence, not a defective net. Troubleshooting is straightforward.
Net Is Sagging in the Middle
A pickleball net sags at the center when the tension end straps are not tight enough, the center strap is too loose, or both. Start by checking the center strap — re-measure the center height. If it reads below 34 inches, tighten the center strap until it hits exactly 34 inches.
If the center height is correct but the net still looks baggy between the center and each post, the end tension straps need tightening. Pull the free end of each strap through the tension clip with a firm, steady pull until the top binding sits taut and level.
One underrated cause: the center support bar is not seated properly in the base frame. If it is leaning or partially dislodged, the center strap has nothing to pull against. Check that the center bar clicks securely into the bottom crossbar before adjusting any straps.
Posts Feel Wobbly or Unstable
A wobbly net post usually means one of three things: the post is not fully inserted into the base socket, the push-button lock did not engage, or the base frame section beneath the socket is not fully connected. Work backward from the post down to the base.
First, press down on the post with both hands while twisting slightly — this re-seats the post if it has shifted out of alignment. Listen for a click. If no click comes, pull the post out entirely and re-insert, making sure the push button on the side of the post is depressed as it goes in and springs back out once the post is fully seated.
If the post is locked but still rocks, check the base frame section that holds the socket. If that section is not fully clicked into the adjacent base tube, the entire end of the frame will have flex in it. Disconnect and reconnect that section, confirming the push button engages on both sides.
On grass or soft dirt setups, ground stakes make a significant difference. If you are not using stakes and the posts are wobbling on a soft surface, press stakes through the base feet until they anchor in firm soil.
Net Height Is Uneven on Each Side
If one side of the net sits higher than the other, the two most common causes are an uneven playing surface and mismatched post height adjustment settings. Place a level along the base frame before assembly if you suspect the ground is sloped — this confirms whether the surface or the net is the issue.
If the ground is flat but the heights still differ, re-measure both posts individually and adjust each post’s height collar independently. Do not adjust both posts by the same amount assuming they were set identically — even small differences in how far each post was pushed into the socket can create a few inches of variance.
On systems with a tape mark on the post (some models include a colored tape indicator for the correct height position), align the top of the height strap to that mark on both posts before measuring. This gives a consistent starting point before fine-tuning.
At this point, you have a solid grasp of every step needed to get a regulation pickleball net standing safely at the right height on any surface. Knowing how to set it up is only part of the picture, though — what you do after the game matters just as much. How you take the net down, store it, and think about its long-term lifespan will determine whether that same net is ready to go next weekend or collecting rust by next spring. The section below covers the finer details that separate players who get one season out of their net from those who get five or more.
What Else Should You Know After Setting Up Your Pickleball Net?
Most players set up the net correctly, play for two hours, and then collapse the whole system into the bag as fast as possible. That last part — the takedown and storage — is where most net damage actually happens.
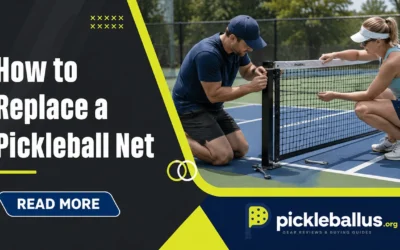
How to Take Down and Store a Portable Net Properly
The fastest way to damage a portable pickleball net is to compress the frame while the net is still attached at full tension. Always release the end tension straps and center strap before collapsing any part of the frame. Trying to fold sections together while the net is still taut puts shear stress on the joints and bends the insertion points over time.
The easiest takedown method — one that many experienced players use — is to loosen both end tension straps first, then unclip the center strap, and then simply leave the net draped over the frame as you slide the sections apart. Many portable systems are designed so that the net can stay looped over the post caps during storage, getting rolled up around the collapsed frame before being placed in the carrying bag. Check your model’s manual — if this method is supported, it saves you from reattaching the net the next time you set up.
After each outdoor session, shake any moisture or debris off the net before bagging it. Metal tubes trap water at the connection points, which is where rust starts. Store the bag in a dry location, not in the trunk of a car or against an exterior wall where temperature swings and humidity accelerate corrosion.
How Long Does a Portable Pickleball Net Last?
A well-maintained portable pickleball net lasts between three and seven years under regular use, with frame material being the biggest factor in longevity. Steel frames are heavier and more rigid but susceptible to rust if left outdoors or stored damp. Aluminum and fiberglass frames resist corrosion better and are lighter to carry, though they can be more prone to denting under hard impacts.
The net mesh itself typically outlasts the frame hardware. Mesh wears along the top binding edge first — the constant friction from overhand contact during ball retrieval frays the vinyl. Some manufacturers sell replacement nets separately, so if your frame is still solid but the mesh is shot, you do not necessarily need to replace the whole system.
Three practices significantly extend net lifespan: storing dry after every outdoor session, never leaving the net assembled outdoors overnight, and tightening only as much tension as needed for regulation height (over-tensioning the end straps stresses the binding attachment points).
A quick inspection once a month — checking the push-button locks, wiping down the frame sections, and examining the mesh for early-stage fraying — catches problems before they turn into mid-game failures.
Can You Use a Tennis Net Instead of a Pickleball Net?
A standard tennis net is 3 feet 6 inches (42 inches) at the posts and 3 feet (36 inches) at the center — too tall for pickleball, which requires 36 inches at the posts and 34 inches at the center. Using a tennis net for pickleball changes the game noticeably. Low dinks that would clear a regulation net by inches will catch the tape repeatedly. The kitchen game — the most strategic part of pickleball — becomes harder to execute correctly at the higher height.
For casual backyard play where the goal is just hitting around, a tennis net works well enough. For anyone practicing drills, playing rated matches, or trying to develop real pickleball skills, the height difference is significant enough to cause bad habits. Shots trained at tennis net height will mis-clear on a regulation pickleball court.
If you are on a tennis court and do not have a portable pickleball net, you can lower the tennis net’s center strap to 34 inches for a closer approximation — but the post height will still be 6 inches too tall. A dedicated portable pickleball net is the right tool for the game.


Write Your Review
No reviews yet. Be the first to share your experience!